Showing posts with label DIY. Show all posts

Tuesday, April 4, 2023

DIY: Wood Mickey and Minnie Easter Egg Decor

It's been a while since I took the time to work on a DIY craft that was just for me.  I keep setting craft supplies aside, and then I never seem to find time to get to it.  So when I saw some wooden Easter eggs at Michael's a few weeks ago, I knew I needed to get them and find the time to make something for Easter.

The result were these cute Mickey and Minnie Mouse Easter Eggs that I'm going to use to decorate our master bathroom!  The best part, is that this was really easy to do.

Here's how I made them!

Materials:

Two Wood Egg Shapes (I got these from Michael's)
Paint Brushes
Black, Red and White Acrylic Paint
Pen or Pencil (not pictured below)
Round Object to Use for Stencil (not pictured below)
Sealant Spray (not pictured below)


1.) Prepare the Wood Eggs
Before I started with anything else, I used a pen to draw a line across both of the egg shapes to show where the black and red paint would meet.  (For mine, I went a little bit above the half way mark.)  Make sure the lines are at the same location on both eggs!


2.) Paint A Base Coat
I started with a coat of red paint on the bottom of both eggs.  After that dried, I painted black on the top half of both eggs being careful to make a clean, as straight as possible line where the red and black paints met in the middle.


3.) Paint More Layers
Depending on what brand of paint you use, you might need to do another coat or two to properly cover the wood.  I had to do a second coat of the red paint, but the black paint I used covered the wood after one layer.  Thankfully, acrylic paint dries pretty quickly so I set a timer for 15 minutes in between coats and jammed out to Disney Hits on Spotify while I waited for each layer to dry.


4.) Add White Details and Touch Ups
Once you are happy with the coverage of red and black paint, you need to add the details.  For Mickey, I drew two large ovals for his buttons and then filled them in with white paint.  For Minnie, I used a round 3D printed piece as a stencil to draw dots all over the red part of the egg.  Then, I filled them in with white paint.  You might need a few coats of white to cover the red paint.  If you make a mistake, this is the time to do touch ups to your red and black sections.  Let the entire thing dry for a while; you want to make sure that it's completely dry before you move to the next step.


5.) Seal the Paint
Once your acrylic paint is dry, you want to seal it.  Acrylic paint can get damaged with water, so you want to give it a spray of acrylic paint sealant to make sure that it doesn't get damaged.  I gave mine two coats of sealant since my decoration is staying inside, but it'll be in the bathroom with lots of moisture.  (If you're putting your eggs outside, I would give them at least 2-3 coats of sealant to protect them from the elements.)


And there you have it... simple and easy Mickey and Minnie Easter Egg Decorations that you can place pretty much anywhere!  These were definitely an easier project for me, but I'm happy to have spent some time doing something for myself and not just for the businesses.  Plus, they'll be really cute to display each Easter and give our master bathroom a little touch of Disney Easter magic!  °o°

I hope you enjoyed this tutorial!  If you make one, please comment below, send me pictures over on Facebook or tag me in your photos on Instagram

Friday, December 9, 2022

Fun Find: DIY Finding Dory Holiday Wreath Video

Happy Friday Friends!!!  Confession: I'm kind of on a wreath kick.  Last week, it was the It's A Small World Wreath video that I shared.  Today, it's another one... but in my defense, I found these videos a few months ago when I was playing on Youtube.  I knew I wanted to share them once it was finally the holiday season... so here we are!  

Today, we're taking a look at how to make this a-DORY-able wreath! 

Photo Source
Eliot and I love Finding Nemo and Finding Dory.  The movies also hold a special place in my heart because we had our wedding reception at the Living Seas Salon in Epcot which is also the home of The Seas with Nemo and Friends!


As soon as I saw this video, I knew that I wanted to save it so I could make us a wreath for our house!  Our guest bathroom is eventually going to be Finding Nemo and Dory themed so this would be the perfect way to great guests during the holiday sea-son!

I hope you enjoyed this DIY video too!  Merry fish-mas!!!  °o°

Friday, December 2, 2022

Fun Find: DIY "It's a Small World" Wreath Video

Happy Friday!  Today I'm sharing a quick little video on a DIY It's a Small World wreath!

Photo Source
It's a Small World is one of Eliot's and my favorite attractions at both Walt Disney World and Disneyland.  I'm also completely obsessed with the ride's gorgeous holiday overlay that they do at the Disneyland Resort time of year.  (Eliot's actually never seen it, but it's definitely on our to do list so he can!)  This video reminds me a lot of it too!


I first saw this video from a few years ago and I've always loved how they made this wreath!  I wish that Disney Family do more of these DIY videos like they used to years ago... but I'm definitely happy with the few I've found.  It's also giving me ideas of how to make my own Small World wreath for our house!

I hope you enjoyed this quick little video!  Happy Holidays everyone!!!  °o°

Friday, October 14, 2022

Fun Find: DIY Disneyland Main Street Mickey Pumpkin Video

Happy Friday Friends!  Today is an extra special day for us because Eliot and I are in San Jose so we can attend the Sharks season opener tonight!  And since we're out of town, I have scheduled a Fun Find Friday post to share with you all today!


I first saw this video a few years ago when Disney Family originally shared it online.  I absolutely love the giant Mickey pumpkin at the end of Main Street in Disneyland.  This felt like the perfect time to share this video since we were just there to visit it in person! 


I absolutely love this video on how to make your own version at home!  I am definitely going to have to make one at some point.  It probably won't be this year since Eliot and I have been really busy, but it's on my radar!  Isn't he cute? 

I hope you enjoyed this cute little video!  Have a wonderful weekend everyone!  °o°

Friday, July 29, 2022

Fun Find: DIY Disney Christmas Decor Video

It's Fri-Yay and we're almost through our Christmas in July Week!  Today, I'm popping in super quick with a fun DIY video to share with you.  

Photo Source

When I first planned out my Themed Week, I wanted to do a DIY project for it.  But, due to circumstances out of my control, that wasn't going to happen at this point in time.  So instead of making a DIY, I decided that I'd check a few videos out online.  I happened to stumble across this one, and it not only combined my idea for a DIY, but it also had a wreath- which was something I had wanted to make!  Check it out!

I thought this video tutorial was a great compromise for my Themed Week DIY.  I might not be able to make anything right now, but I can watch someone else do it!  I want to make a felt Mickey wreath for our house.  It would make a great gift for my Mom too... 

Thankfully, there's plenty of time between now and Christmas!  So I still have plenty of time to get my holiday DIY craftiness on!  Enjoy your weekend friends!!!  °o°

Wednesday, February 23, 2022

DIY: Mickey Mouse Winter Yarn Wreath

How is February already almost over?!?  We're seven and a half weeks into 2022 and time is chugging on faster than it needs to be.  I've been wanting to work on something personal (for our house) for a few months now, but time hasn't been on my side.  After missing out on making crafts for the holiday season, I really wanted to start this year off right.  I've also been wanting to make this wreath project for a few months, and I finally decided to do it before winter slips by and fades into spring!

Back at the height of the holiday season in November and December, I saw so many people making these.  I'm in a Disney home decor group on Facebook and everyone was going crazy for these fuzzy Mickey Mouse yarn wreaths.  They are so easy to make and they're perfect for Christmas and the winter months!  

Want to make one of these cute Mickey yarn wreaths for yourself?  Here's how I did it!

Materials:

1 Large Wire Wreath Bases (I used a 18" wreath base)
2 Smaller Wire Wreath Bases (I used two 12" wreath bases)
White or Ivory Chunky Yarn (I used 1 full skein, plus a little bit of a second one)
Zip Ties
Scissors
Optional- Embellishments and Seasonal Decor (snowflakes, ribbon, floral picks, etc.)


1.) Attach the Ears to Your Large Wreath Base

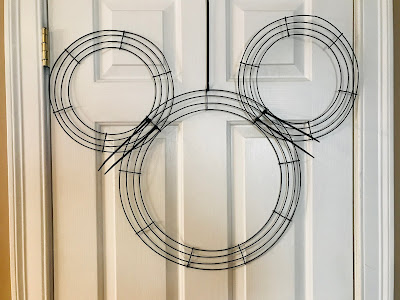
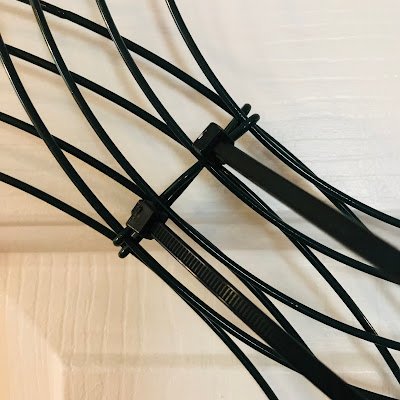
The first thing I did was attach my two smaller wreath bases to the large one.  In order to keep them even, I used the cross wires on the large one to space the ears.  Then, I covered those with the cross wires on the smaller wreaths.  Once they were lined up, I used zip ties to attach them to each other.  (See photo below.)  On one side, I only needed two, while the other side needed three to keep the ears secure.  Cut the zip ties when you are happy with their placement.


2.) Wrap the Ears

Next, wrap the ears with yarn.  Tie the end of the yarn to one of the wires and then start wrapping it around the wreath form.  I quickly found out that the skein of yarn was too much to keep passing thorough the wreath, so I cut my yarn into smaller sections to make it easier.  When you reach the end of that yarn strand, you can tie it to the wreath, or you can tuck the ends under one of the other wraps on the back.  Start another strand and keep doing this until you've covered both ears.


3.) Wrap the Bottom Part of the Head

I used the same process as Step #2 to wrap the bottom part of the head.  I started below one ear and kept going until I reached the bottom of the other one.  You can tuck the ends of the yarn into the area where the ears and head meet.  (See photo below.)


4.) Wrap the Area Around the Ears and Top of the Head

The hardest part for me was wrapping the yarn around the area where the ears and the top of the head meet.  Thankfully, with the wire wreath bases you can wrap the yarn in multiple areas.  I looked at where I needed to fill the ears and then wove the yarn around that spot.  In some places, I was only covering part of the wreath form and going in between the wires.  While in other areas, I went from the head all the way through to the ear.  Just do what looks right and fills in that area so it looks clean.  Oh, and don't forget to make sure you cover the zip ties!  (See photo below.)


5.) Fluff and Add Embellishments (Optional)

Once that entire area around and between the ears is covered in yarn, you're done!  I hung my wreath up and fluffed out of of the areas where the yarn was tight.  Once it's wrapped, you can gently move the yarn if it's too tight or too loose in areas.  

If you want, add embellishments and/or seasonal decor to give your wreath more of a pop!  I wanted to put buffalo plaid ribbon on mine but I couldn't find it.  (Hence why I used Eliot's buffalo plaid Snoopy blanket as a backdrop instead; I just love how it looks against buffalo plaid!)  Also, if you don't use hot glue to permanently attach your decorations, you could change it for the seasons.  I think you could use ribbon, glittery snowflakes, or floral picks and they would all look beautiful with this wreath.  It's such a simple and neutral design that you could do a lot with it!  It also looks great as is!


Isn't this Mickey Mouse Winter Yarn Wreath cute?!?!  It's really soft too.  I also love how the yarn I found has little specks of metallic silver in it!  It makes it a little bit shimmery.  I'm definitely going to make more of these Mickey wreaths for our house!

I hope you enjoyed this tutorial!  If you make one, please comment below, send me pictures over on Facebook or tag me in your photos on Instagram!  °o° 

Tuesday, August 3, 2021

DIY: Mickey Watermelon Decor

It's no secret that Eliot and I have been crazy busy with our businesses lately.  I haven't taken much time for myself and I've been stressed about being behind our projected timeline with our orders.  I had a little bit of time to kill this afternoon while I was at a standstill waiting for stuff to print.  I decided that I wanted some me time to make a quick craft project.  Since today is National Watermelon Day, I thought that this little watermelon project was perfect!  It was quick, fun and a nice little break!

It's been a long time since I did a DIY tutorial.  (I think my last one was my Olaf Winter Snow Sign back in December of 2016.)  In fact, it's been a while since I allowed myself to work on a crafting project that didn't have to do with our businesses.  I've started a few things here and there, but I haven't made time to complete them.

Eliot and I bought this watermelon slice sign decoration at the Christmas Tree Shop last year when it was on clearance at the end of summer.  I thought it would make a cute little decoration if I spruced it up a bit.  We like bright and bold colors, so I thought I'd give it a magical makeover!  I love how it turned out!  Here's how I did it!

Materials:

  • Watermelon Slice Decor (or wood/MDF half circle from the craft store)
  • Paint Brushes
  • Lime and Pink Acrylic Paint
  • White and Green Acrylic Paint (or Paint Pens)
  • Black Mickey Seeds and Glue (or many other things- see #5 below)
  • Acrylic Sealant Spray


1.) Paint A Base Coat
For my base coat, I freehanded the lime over the existing green.  Then, I painted the pink over the existing pink.  In some places, the pink and lime paint touch but that's ok!


2.) Paint More Layers
For my watermelon design, I painted a bunch of coats of lime and pink until the existing design was no longer visible.  I probably could have avoided this if I'd spray painted the entire thing with primer first.  But acrylic paint dries pretty quickly so I set a timer for 10 minutes in between coats and jammed out to Disney Hits on Sirius while I waited.


3.) Add White and Green Details
Once you are happy with the coverage of pink and lime paint, you need to add the details.  For the white, I used a small paint brush to paint a white line between the pink and the lime to represent the rind.  I just freehanded it, but you could draw a light pencil line as a guide if you want.  For the green, I decided to paint the edges of the front and sides so it would look like the outside of a real watermelon with the outer skin.  

You could also use a paint pen for the white and green if you have them.  (I would have used them for this but I didn't have any on hand.)  If you need to, make any touch ups to your pink and lime sections.  Let the entire thing dry for a while since you want to make sure that it's completely dry before you move to the next step.


4.) Seal the Paint
Once your acrylic paint is dry, you want to seal it.  Acrylic paint can get damaged with water, so you want to give it a spray of acrylic paint sealant to make sure that it doesn't get damaged.  I gave it one coat of sealant since my decoration is staying inside.  If you're using it outside, I'd give it 2-3 coats of sealant to protect it from the elements.


5.) Add Mickey Seeds
Finally, I glued my black Mickey seeds to the design in a scattered pattern.  I used our 3D printer to create small Mickey seeds, but you can also use vinyl and a Mickey paper punch, or find black Mickey stickers.  Or you could use black rhinestones, beads or pearls!  If you can't find those, break out a black paint pen or puffy paint and use that- just use your imagination!  You could even add text if you want to!


Isn't this watermelon decoration adorable?  I love the little Mickey seeds on it.  I'm so glad that I took a few minutes for myself this afternoon!  I really need to start doing this more often.  It was so nice to work on a little project and have it finished in one sitting!  

I hope you enjoyed this tutorial!  If you make one, please comment below, send me pictures over on Facebook or tag me in your photos on Instagram

HappNationaWatermeloDay!!!  °o°

Friday, December 1, 2017

December 2017 Calendar

Another year is almost over.  I'm not quite sure how this happened.  I feel like I just sat down to write my 2017 goals and here we sit at the beginning of December.  This year has admittedly been a crazy one, but I'm thankful for all of the doors that have opened as a result of the crazy.  Plus, it's not quite over yet... my favorite time of the year is just beginning!  This year, I kick off December by heading to Disneyland later today!  Here's to a wonderful December and holiday season!


Like last year, I've also made a blank version of the 2017 calendar without the holidays to make them more versatile.  Over the past 4 years, my calendars have been used for lots of things including: Disney trip countdowns, teachers' Disney themed classrooms, training calendars for runDisney events and to surprise kids with a Disney vacation!

Here's the link to download the December 2017 PDF version of the printable.

Here's the link to download the Blank December 2017 PDF version of the printable.


Feel free to link this post up to Pinterest or Facebook so your friends and family can have a fun Mickey and Minnie calendar too!  Let's spread the Disney Magic!!!  °o°

Note: I've made calendars through 2018.  I don't post the PDF links on my blog until the beginning of each month.  If you're looking for a particular month and would like me to email it to you ahead of my post going live, you can send my blog an email at mydisneylifeblog[at]gmail.com.  I'll send you the PDFs directly as soon as I can!  :-)

Saturday, November 4, 2017

November 2017 Calendar

Hello November... how on earth is it November?  Here we are again, 4 days into the month and I'm FINALLY posting this.  Eliot and I have continued to burn the candle at both ends.  In fact, I just woke up from a nap.  Yep, a three hour nap.  In the middle of the day.  From 3:00-6:00 pm.  It's sad when you wake up to nighttime.  After Daylight Savings falls back tonight, it will be nighttime a lot sooner too.  Boo.

I still haven't had a chance to make the 2018 calendars.  I'm going do those tonight or tomorrow.  Not because I finally have time, but out of necessity.  Eliot and I have a VERY busy November ahead of us... filled with lots of good things, but it's going to be insanely busy.  So, I'll have to get the calendars done or they won't get done at all.  (If you're waiting on an email, you should have that soon!)  

Anyways... speaking of November, here are my calendars!!!


Like last year, I've also made a blank version of the 2017 calendar without the holidays to make them more versatile.  Over the past 4 years, my calendars have been used for lots of things including: Disney trip countdowns, teachers' Disney themed classrooms, training calendars for runDisney events and to surprise kids with a Disney vacation!

Here's the link to download the November 2017 PDF version of the printable.

Here's the link to download the Blank November 2017 PDF version of the printable.


Feel free to link this post up to Pinterest or Facebook so your friends and family can have a fun Mickey and Minnie calendar too!  Let's spread the Disney Magic!!!  °o°

Note: I've made calendars through 2017.  I don't post the PDF links on my blog until the beginning of each month.  If you're looking for a particular month and would like me to email it to you ahead of my post going live, you can send my blog an email at mydisneylifeblog[at]gmail.com.  I'll send you the PDFs directly as soon as I can!  :-)
SaveSaveSaveSave

Friday, October 6, 2017

October 2017 Calendar

Well, here we are in October.  You know it's been a busy month when I haven't even posted anything since last month's calendar, and it's already 6 days into the new month.  (I'm so sorry for the delay... I completely forgot to post this on the 1st.)  Eliot and I continue to be very busy with Happily Ever Hatter.  We've had some milestone moments over the past month that I'd like to share, so hopefully I'll be back soon to tell you about those.  Also, I still haven't had a chance to make the 2018 calendars, but I'm hoping to get to those soon.  For now, here's October.  Better late than never, right?


Like last year, I've also made a blank version of the 2017 calendar without the holidays to make them more versatile.  Over the past 4 years, my calendars have been used for lots of things including: Disney trip countdowns, teachers' Disney themed classrooms, training calendars for runDisney events and to surprise kids with a Disney vacation!

Here's the link to download the October 2017 PDF version of the printable.

Here's the link to download the Blank October 2017 PDF version of the printable.


Feel free to link this post up to Pinterest or Facebook so your friends and family can have a fun Mickey and Minnie calendar too!  Let's spread the Disney Magic!!!  °o°

Note: I've made calendars through 2017.  I don't post the PDF links on my blog until the beginning of each month.  If you're looking for a particular month and would like me to email it to you ahead of my post going live, you can send my blog an email at mydisneylifeblog[at]gmail.com.  I'll send you the PDFs directly as soon as I can!  :-)
SaveSave

Friday, September 1, 2017

September 2017 Calendar

Hi friends!  It's been another busy month!  How is it already September?!?  This year, today marks a special occasion as it's the year the "19 Years Later" epilogue takes place in the Harry Potter series.  Perhaps, that's why I'm more aware of the date.  (At least this time around I remembered to post on the first of the month!)  For those of you asking, I haven't made the 2018 calendars yet, but I'll be working on those soon.  In the meantime, here's my free September printable calendar!


Like last year, I've also made a blank version of the 2017 calendar without the holidays to make them more versatile.  Over the past 4 years, my calendars have been used for lots of things including: Disney trip countdowns, teachers' Disney themed classrooms, training calendars for runDisney events and to surprise kids with a Disney vacation!

Here's the link to download the September 2017 PDF version of the printable.

Here's the link to download the Blank September 2017 PDF version of the printable.


Feel free to link this post up to Pinterest or Facebook so your friends and family can have a fun Mickey and Minnie calendar too!  Let's spread the Disney Magic!!!  °o°

Note: I've made calendars through 2017.  I don't post the PDF links on my blog until the beginning of each month.  If you're looking for a particular month and would like me to email it to you ahead of my post going live, you can send my blog an email at mydisneylifeblog[at]gmail.com.  I'll send you the PDFs directly as soon as I can!  :-)

Tuesday, August 1, 2017

August 2017 Calendar

Hello August!  I can't believe how fast this summer is going by.  I feel like I just posted my July calendar and now it's already August.  (Christmas is going to be here before I know it... Ahh!!!)  In fact, I totally forgot that today was the first and that I had to post my calendar until it suddenly donned on me at about 10:00 pm tonight.  So without further ado, here it is!!!


Like last year, I've also made a blank version of the 2017 calendar without the holidays to make them more versatile.  Over the past 4 years, my calendars have been used for lots of things including: Disney trip countdowns, teachers' Disney themed classrooms, training calendars for runDisney events and to surprise kids with a Disney vacation!

Here's the link to download the August 2017 PDF version of the printable.

Here's the link to download the Blank August 2017 PDF version of the printable.


Feel free to link this post up to Pinterest or Facebook so your friends and family can have a fun Mickey and Minnie calendar too!  Let's spread the Disney Magic!!!  °o°

Note: I've made calendars through 2017.  I don't post the PDF links on my blog until the beginning of each month.  If you're looking for a particular month and would like me to email it to you ahead of my post going live, you can send my blog an email at mydisneylifeblog[at]gmail.com.  I'll send you the PDFs directly as soon as I can!  :-)
SaveSave

Saturday, July 1, 2017

July 2017 Calendar

Happy July!!!  I can't believe that this year is officially half over!!!  I don't know about you, but it's flown right by for me!  I'm so excited about the warm weather and sunshine though!  (It's nice to have the sunlight around longer too!)  I'm definitely going to enjoy it while it lasts!  Speaking of a new month, here's my free printable calendar!


Like last year, I've also made a blank version of the 2017 calendar without the holidays to make them more versatile.  Over the past 4 years, my calendars have been used for lots of things including: Disney trip countdowns, teachers' Disney themed classrooms, training calendars for runDisney events and to surprise kids with a Disney vacation!

Here's the link to download the July 2017 PDF version of the printable.

Here's the link to download the Blank July 2017 PDF version of the printable.


Feel free to link this post up to Pinterest or Facebook so your friends and family can have a fun Mickey and Minnie calendar too!  Let's spread the Disney Magic!!!  °o°

Note: I've made calendars through 2017.  I don't post the PDF links on my blog until the beginning of each month.  If you're looking for a particular month and would like me to email it to you ahead of my post going live, you can send my blog an email at mydisneylifeblog[at]gmail.com.  I'll send you the PDFs directly as soon as I can!  :-)

Friday, June 2, 2017

June 2017 Calendar

Happy June everyone!  I can't believe it's already June.  In fact, other than knowing that yesterday was my Dad's birthday, it totally escaped me that it was a new month.  I thought about the calendar, and then by the end of the work day it had completely slipped my mind.  Here it is!  I'm so sorry for the delay!


Like last year, I've also made a blank version of the 2017 calendar without the holidays to make them more versatile.  Over the past 4 years, my calendars have been used for lots of things including: Disney trip countdowns, teachers' Disney themed classrooms, training calendars for runDisney events and to surprise kids with a Disney vacation!

Here's the link to download the June 2017 PDF version of the printable.

Here's the link to download the Blank June 2017 PDF version of the printable.


Feel free to link this post up to Pinterest or Facebook so your friends and family can have a fun Mickey and Minnie calendar too!  Let's spread the Disney Magic!!!  °o°

Note: I've made calendars through 2017.  I don't post the PDF links on my blog until the beginning of each month.  If you're looking for a particular month and would like me to email it to you ahead of my post going live, you can send my blog an email at mydisneylifeblog[at]gmail.com.  I'll send you the PDFs directly as soon as I can!  :-)