Showing posts with label wreath. Show all posts

Friday, December 9, 2022

Fun Find: DIY Finding Dory Holiday Wreath Video

Happy Friday Friends!!!  Confession: I'm kind of on a wreath kick.  Last week, it was the It's A Small World Wreath video that I shared.  Today, it's another one... but in my defense, I found these videos a few months ago when I was playing on Youtube.  I knew I wanted to share them once it was finally the holiday season... so here we are!  

Today, we're taking a look at how to make this a-DORY-able wreath! 

Photo Source
Eliot and I love Finding Nemo and Finding Dory.  The movies also hold a special place in my heart because we had our wedding reception at the Living Seas Salon in Epcot which is also the home of The Seas with Nemo and Friends!


As soon as I saw this video, I knew that I wanted to save it so I could make us a wreath for our house!  Our guest bathroom is eventually going to be Finding Nemo and Dory themed so this would be the perfect way to great guests during the holiday sea-son!

I hope you enjoyed this DIY video too!  Merry fish-mas!!!  °o°

Friday, December 2, 2022

Fun Find: DIY "It's a Small World" Wreath Video

Happy Friday!  Today I'm sharing a quick little video on a DIY It's a Small World wreath!

Photo Source
It's a Small World is one of Eliot's and my favorite attractions at both Walt Disney World and Disneyland.  I'm also completely obsessed with the ride's gorgeous holiday overlay that they do at the Disneyland Resort time of year.  (Eliot's actually never seen it, but it's definitely on our to do list so he can!)  This video reminds me a lot of it too!


I first saw this video from a few years ago and I've always loved how they made this wreath!  I wish that Disney Family do more of these DIY videos like they used to years ago... but I'm definitely happy with the few I've found.  It's also giving me ideas of how to make my own Small World wreath for our house!

I hope you enjoyed this quick little video!  Happy Holidays everyone!!!  °o°

Wednesday, February 23, 2022

DIY: Mickey Mouse Winter Yarn Wreath

How is February already almost over?!?  We're seven and a half weeks into 2022 and time is chugging on faster than it needs to be.  I've been wanting to work on something personal (for our house) for a few months now, but time hasn't been on my side.  After missing out on making crafts for the holiday season, I really wanted to start this year off right.  I've also been wanting to make this wreath project for a few months, and I finally decided to do it before winter slips by and fades into spring!

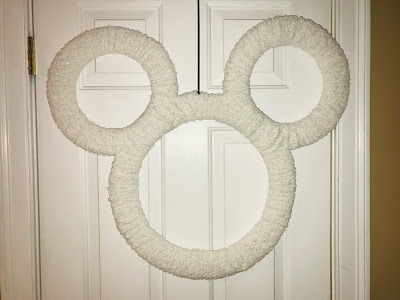
Back at the height of the holiday season in November and December, I saw so many people making these.  I'm in a Disney home decor group on Facebook and everyone was going crazy for these fuzzy Mickey Mouse yarn wreaths.  They are so easy to make and they're perfect for Christmas and the winter months!  

Want to make one of these cute Mickey yarn wreaths for yourself?  Here's how I did it!

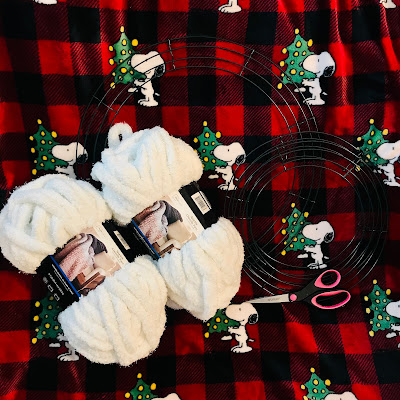
Materials:

1 Large Wire Wreath Bases (I used a 18" wreath base)
2 Smaller Wire Wreath Bases (I used two 12" wreath bases)
White or Ivory Chunky Yarn (I used 1 full skein, plus a little bit of a second one)
Zip Ties
Scissors
Optional- Embellishments and Seasonal Decor (snowflakes, ribbon, floral picks, etc.)


1.) Attach the Ears to Your Large Wreath Base

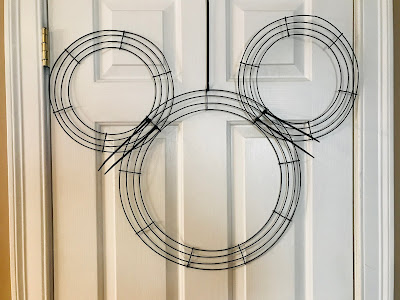
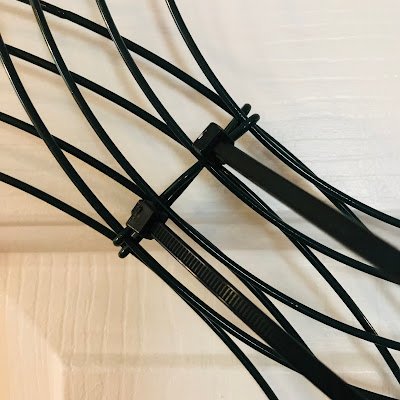
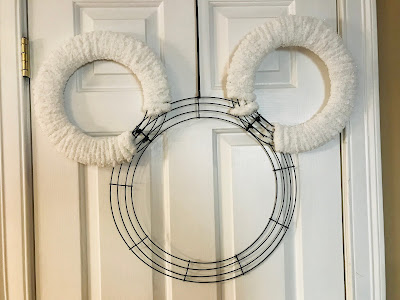
The first thing I did was attach my two smaller wreath bases to the large one.  In order to keep them even, I used the cross wires on the large one to space the ears.  Then, I covered those with the cross wires on the smaller wreaths.  Once they were lined up, I used zip ties to attach them to each other.  (See photo below.)  On one side, I only needed two, while the other side needed three to keep the ears secure.  Cut the zip ties when you are happy with their placement.


2.) Wrap the Ears

Next, wrap the ears with yarn.  Tie the end of the yarn to one of the wires and then start wrapping it around the wreath form.  I quickly found out that the skein of yarn was too much to keep passing thorough the wreath, so I cut my yarn into smaller sections to make it easier.  When you reach the end of that yarn strand, you can tie it to the wreath, or you can tuck the ends under one of the other wraps on the back.  Start another strand and keep doing this until you've covered both ears.


3.) Wrap the Bottom Part of the Head

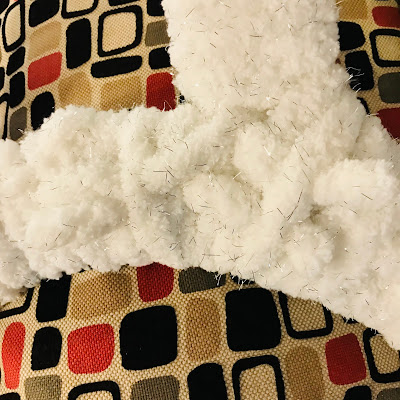
I used the same process as Step #2 to wrap the bottom part of the head.  I started below one ear and kept going until I reached the bottom of the other one.  You can tuck the ends of the yarn into the area where the ears and head meet.  (See photo below.)


4.) Wrap the Area Around the Ears and Top of the Head

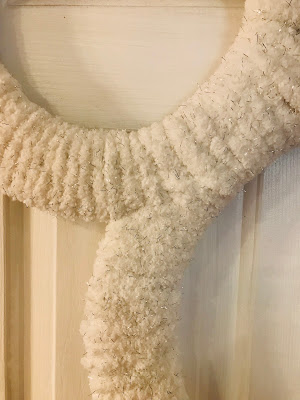
The hardest part for me was wrapping the yarn around the area where the ears and the top of the head meet.  Thankfully, with the wire wreath bases you can wrap the yarn in multiple areas.  I looked at where I needed to fill the ears and then wove the yarn around that spot.  In some places, I was only covering part of the wreath form and going in between the wires.  While in other areas, I went from the head all the way through to the ear.  Just do what looks right and fills in that area so it looks clean.  Oh, and don't forget to make sure you cover the zip ties!  (See photo below.)


5.) Fluff and Add Embellishments (Optional)

Once that entire area around and between the ears is covered in yarn, you're done!  I hung my wreath up and fluffed out of of the areas where the yarn was tight.  Once it's wrapped, you can gently move the yarn if it's too tight or too loose in areas.  

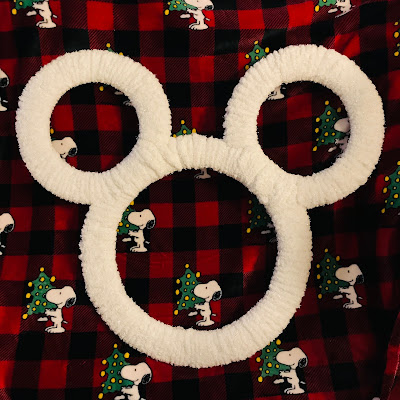
If you want, add embellishments and/or seasonal decor to give your wreath more of a pop!  I wanted to put buffalo plaid ribbon on mine but I couldn't find it.  (Hence why I used Eliot's buffalo plaid Snoopy blanket as a backdrop instead; I just love how it looks against buffalo plaid!)  Also, if you don't use hot glue to permanently attach your decorations, you could change it for the seasons.  I think you could use ribbon, glittery snowflakes, or floral picks and they would all look beautiful with this wreath.  It's such a simple and neutral design that you could do a lot with it!  It also looks great as is!


Isn't this Mickey Mouse Winter Yarn Wreath cute?!?!  It's really soft too.  I also love how the yarn I found has little specks of metallic silver in it!  It makes it a little bit shimmery.  I'm definitely going to make more of these Mickey wreaths for our house!

I hope you enjoyed this tutorial!  If you make one, please comment below, send me pictures over on Facebook or tag me in your photos on Instagram!  °o° 

Saturday, January 31, 2015

Scrapbook Swap: Disney Christmas Layout

A few months ago, I joined another swap for my Disney Scrapbook Facebook group. As you may recall, I also did the Christmas in July Card swap last summer.  I had a blast and I wanted to participate in another swap during the holiday season!  I was lucky enough to sign up in time to participate in the Disney Christmas Layout Swap!


This was was for a two page Disney Christmas layout.  You had to sign up in the event in our Facebook group.  Next, you had to select which design you wanted to do.  There were 20 design choices, one for each member of the swap, and each member had to make a total of 20 cuts.  Once you finished your cuts, you had to place them each in a Ziplock bag.  Then you put all 20 baggies in one larger Ziploc bag and mailed the entire package to the swap organizer.  (We paid her $5.95 for postage to receive our package with all of the other members' cuts in return.)


Some of the choices to pick from included: Santa & Mrs. Claus, Christmas tree, Candy canes, Gingerbread, Stockings, Presents, Elf, Snowman, Wreath, Snowflakes, Ribbon, Title or a Border.  I chose frames since that choice seemed like it would be pretty easy. (I still don't know how to work my Cricut so I wanted to stay away from things I couldn't cut by another method!)  I had to make two frames per person- or 40 total.  I decided to make glitter backgrounds to "frame" photos with.  Who doesn't love glitter right?  


Frozen is really popular (obviously) so I made a winter snowflake themed frame.


For my second design, I made a Christmas frame with Mickey Mouse ornaments!  I love how cute the Mickey ornaments came out!  (My Mickey paper punch is my hero!!!)


I've been anxiously waiting for my package so I could show you the items I received from the swap!  The package finally came in the mail yesterday and I'm so happy with everything!!!  I love all of the designs.  These ladies are so creative!  This is a great way to get ideas for new designs to use in my own scrapbook designs!  I really need to get working on that Cricut.  I can see myself having way too much fun with that!


Here are a few of my favorites from the swap!  I love the little Mickey parts on the Christmas tree!  That's such a great idea!  The stockings and wreath are also adorable. My favorite is the Mickey Christmas light border.  (You know I'm a sucker for Christmas lights!)  These are going to look great with my new Disney holiday papers!  I can't wait to join more layout and die cut swaps!!!  My Disney scrapbooks are going to rock!  °o°

Monday, July 28, 2014

Exciting News!

Hey Disney Friends!  I have some exciting news that's been in the works for a little while now: Happily Ever Hatter has officially teamed up with Sparkle For Your Castle!


You may recall me featuring Dar's beautiful Disney wreaths as June's Fun Find Friday!  I have to confess at the time I did that post, I was holding out on you guys a bit.  I told you I placed an order for a wreath from Dar.  What you didn't know was that she had also ordered a few items from me!  But, I didn't want to spill the beans until she announced the wreath collection they were going to be included in.  Well, they're here!!!

Dar has released five different Frozen Wreaths, and three of those feature items from Happily Ever Hatter.  They're absolutely stunning and I love them all.  I'd love to have one for my office door but I'm having a really hard time deciding which one I'd get!

Here's the Frozen wreath featuring my Anna hat design.

Frozen Wreath Anna Ear Hat by Sparkle For Your Castle

This is the same Frozen wreath but it's featuring my Elsa hat design instead.

Frozen Wreath Elsa Ear Hat by Sparkle For Your Castle

Dar also ordered a few of my Frozen snowflakes!  They're really cute on Olaf's Personal Snow Flurry wreath!  Olaf's even holding one of my snowflakes!  It's so cute!

Frozen Olaf Wreath by Sparkle For Your Castle

I absolutely love the idea of "building" Olaf on this wreath.  And he talks!!!  There are also adorable hidden Mickey snowballs, and icicles hanging from the sign.  My snowflakes are not shown on the wreath as is, but they are an option if you want to add them!

Do You Want To Build A Snowman Wreath by Sparkle For Your Castle

There is a video of Dar introducing the wreaths on her Facebook page.  She gives her fans a tour of her "Sparkle Studio" and then shows all of the Frozen wreaths.  You can see how pretty they sparkle in the video.  (The direct link for the video is here.)

She also made individual wreaths of Anna and Elsa.  (There aren't Happily Ever Hatter items on these, but they're stunning and I wanted to show them to you guys anyways!)

Disney Frozen Anna Wreath by Sparkle For Your Castle

I'm currently working on a few other custom designs for Dar, so stay tuned on both of our Facebook pages for more information on those!  (Here are the links for our Facebook pages: Happily Ever Hatter and Sparkle for Your Castle.)

Disney Frozen Elsa Wreath by Sparkle For Your Castle

As always, if you have a custom request for a specific character, holiday, event or theme please ask!  Dar and I can work together to create something special for your home!  °o°

Note: All of these photos are from Sparkle For Your Castle's Etsy and Facebook pages. Dar owns the copyright on them.  Please do not use them without her permission.

Friday, June 6, 2014

Fun Find: Sparkle For Your Castle

Hi Friends!  It's time for another Fun Find!  I've decided that I'm going to try to do them on Fridays at least once a month.  I'll call them Fun Find Fridays!  Sounds "fun" right?

This week's Fun Find is: Sparkle For Your Castle!


Sparkle For Your Castle is your one stop shop for any Disney inspired wreath!  There are designs for holidays, special events, and designs based off of your favorite characters!


I discovered Darlene's Etsy shop about a year and a half ago.  I don't even remember how I found it, but once I did, there was no turning back.  I was completely hooked.  I immediately fell in love with all of her amazing creations.  My regular readers have heard about my Disney holiday merchandise addiction.  This was like heaven for me!


Sparkle For Your Castle also has a Facebook page.  Dar is always posting photos of new products and ideas that she has!  It's a great interactive page too!  She asks her fans, or "Sparklers", their opinions of ideas, colors, and design concepts.  She also occasionally does wreath giveaways!


Dar has "featured" wreath themes each month.  In the past, she's done Alice in Wonderland and a "Touch of Color" (black and white with a pop of color).  For June, she's making Nightmare Before Christmas Wreaths!


One thing I'd really like to point out, is that Darlene is a sweetheart.  She's so nice and caring.  You don't always know who you're working with when you order things online. But you can rest assured that Dar creates products with integrity, love and hard work. She's very Etsy "convo" friendly if you have a certain question or custom request!


And it goes without saying that all of her wreath designs are gorgeous!  (Seriously, I want them all-one for each holiday.  And a few character wreaths, just because...)


The best part, is that her designs are very customizable!  If there's something that you can't find, you can contact her and she'll do her best to create something for you.  I hardly ever find Disney Hanukkah items, so I'm thinking about getting a wreath this year!


She's created wreath designs for customers' Disney kitchens!


As well as a wreath design inspired by the new Maleficent movie!


In fact, I ordered my first Sparkle For Your Castle wreath a little over a week ago and I'm anxiously waiting for it to arrive!  (I got confirmation that it shipped out and I can't wait to see it!)  I've admired this pool themed wreath for so long.  I decided it was time to get it before Dar ran out of the cute little plush on it!  And it's also time for another confession... we don't even have a pool!  But, someday we will!  And if our only "pool" this summer is a 2 foot deep kiddie pool to sit in, I will still enjoy looking at my adorable wreath!


If you're looking for some Disney decor for your house, definitely check our Dar's shop when you want to "add some Sparkle to your Castle!"  °o°

Note: All of these photos are from Sparkle For Your Castle's Etsy and Facebook pages. Dar owns the copyright on them.  Please do not use them without her permission.

Saturday, April 19, 2014

DIY Project: Mickey and Minnie Easter Wreath

Hi Friends!  I have one more tutorial for Easter!  I wanted something else to display for the holiday.  I was searching for inspiration on Pinterest when I decided that making a wreath would be the perfect idea.  Lately, I'm super obsessed with making wreaths and other door decorations.  I love how they greet you when you first enter the house!


I found a few pins on Pinterest that I got inspiration from. First, I found this wreath made with plastic eggs and Easter grass.  Then, I found a tutorial for cute Minnie Easter eggs.  I took both of those general ideas and came up with my own design for my wreath!

Here's how I created my Mickey and Minnie Easter Wreath:


Materials:
Foam Wreath Form
Green Easter Grass
Large Plastic Easter Eggs
Red Spray Paint
Black Spray Paint
Sheet of Craft Foam
White Acrylic Paint
Paint Brush or Foam Sponge
Scissors
Hot Glue Gun
Quarter
Pen or Pencil
Smaller Ribbon

Optional: Flowers, Ribbon for bow, and Plush

Steps to Make Mickey and Minnie Easter Wreath:


1.) Make Foam Ears
Take your craft foam and 12 draw circles with your quarter.  Cut out the circles.  Then draw a crescent shape on one side of your circle that resembles the curve of your egg.  If you have to, use trial and error a few times to get it right.  Once you have a shape that fits your egg, use that circle and trace the shape on all of your circles.  Cut them all out and you have your ears!


2.) Glue Ears to Eggs
If you have hinged eggs, unhinge them using your scissors.  Mine had really small hinges that easily came off.  Separate the "tops" and "bottoms" of the eggs.  (The top part is the smaller side, and the bottom is the pointy side.)  Use hot glue to attach your ears to the tops of the eggs.  Get rid of any glue trails once the glue is cool.


3.) Spray Paint Eggs
Spray paint the tops of your eggs black and the bottoms red.  I had to use two coats on mine since the spray paint didn't completely adhere to the plastic eggs the first time.  I waited 30 minutes between coats.  Then I let them dry for about an hour and a half.


4.) Assemble the Base of the Wreath
While you're waiting for your eggs to dry, you can start assembling the wreath.  Tie a smaller ribbon around the wreath and glue it securely to the wreath form.  Then, take your Easter grass and slowly glue it around the wreath.  The hot glue will start to melt your grass, so you have to take your time with it.  I did small areas of 2-3 inches at a time, being careful to press the grass down into the glue.  Once you finish doing the front of the wreath, flip it over and secure the rest of the grass to the back.  (Covering the entire back is not as important as long as it's on a solid door where it won't be seen.)


After that, hang your wreath up so you can see where the extra grass hangs.  (I hung mine up on my wreath hook.)  Use your scissors to trim any grass that hangs.  You can see from my before and after photo how much better it looks with a little trim!  Have your vacuum handy since it can get messy!


5.) Decorate Eggs
Once your eggs are completely dry, reassemble the tops and bottoms.  Take your white paint and create two oval shapes for Mickey's buttons on his shorts.  Make Minnie eggs by painting white dots on the red part to mimic her polka dot dress.  I didn't bother to paint the back of my Minnie Mouse eggs since they won't be visible once they're attached.


6.) Arrange Eggs and Flowers
Once your eggs are dry, you can take your wreath and decide how you want to arrange them.  I decided to add yellow silk daisies to my wreath to symbolize Mickey and Minnie's yellow shoes.  Also, if you'd like to add bows to your Minnie eggs, you can do this now.


7.) Attach Eggs, Flowers and Decorative Elements
Use your hot glue gun to attach the eggs and flowers to your wreath.  Remember that the glue will melt your grass so press the eggs and flowers down firmly so they'll be secure. Add any other decorative elements such as the flowers.  I made a simple ribbon bow to add to the top.  You can also add small Mickey and Minnie beanie plush to the center if you'd like.  Once everything is glued down, you're done!


I absolutely love how cute the wreath came out!  I'm bummed out that I didn't make it sooner!  I'll probably end up leaving it up until the end of April.  And I'm sure I'll get a few requests to make some more for family members... watch out after Easter sales!  I'm coming for you!

I hope you guys enjoyed this tutorial.  If you make your own wreath let me know in the comments.  I'd love to see how they turn out!  Enjoy your new Easter wreath!!!  °o°

Sunday, December 29, 2013

Christmas 2013

Hey Everyone!  Wow, it's been quite a while since I visited my blog!  (About a week and a half!  Ouch!)  You know how it goes: the holidays sneak up on you, then they're here, and you're scurrying around like crazy trying to get everything done!  But, now I'm back!  

I hope that you all had a wonderful Christmas!

Our 2013 Christmas Card!
Our Christmas was really nice this year.  Eliot and I went to my parents' house to join them, my grandparents and my brother for our Christmas celebrations!  Eliot had quite a few days off from work so we actually got to drive up Saturday and come back later Christmas Day!  It was nice to get away for a few days!

On our drive up Saturday, we stopped by my Mom's side of the family's Christmas Party! We were starting to get another winter storm so my parents and grandparents actually stayed home.  Eliot and I stopped to get the presents since it was on our way home anyways.  My Aunt Sherrie graciously fed us while we were there.  (Yum!)  And we did get to visit with a few of my relatives before we had to leave.

While we were there, we gave my little cousin Emery (our ringbearer) one of his gifts.  He loves Jake and the Neverland Pirates, especially Captain Hook.  Eliot and I found him a Captain Hook ornament!  He was so excited!  He tried to stuff it in his pocket, which was hilarious.  (I wish I'd video taped it!)  Eventually, Captain Hook made it onto the tree!


Sunday and Monday, "Downeast" Maine got a major ice storm and we were basically stuck inside both days.  We had plenty of food and a wood stove if necessary, so there was no reason to go out in the storm. The rain froze on contact and everything was covered in ice.  The tree branches bent over and a lot of trees fell over onto the power lines.  We lost power a few times during the storm.  During one outage, we started to get a little bored staring into the darkness.  To liven things up, I had Eeyore wave around a flashlight "light saber" for a few minutes.


Monday I decided that I better finish up my Christmas presents just in case we completely lost power.  I had planned to make a wreath for Mom and Dad as well as Nana and Papa.  It was my first attempt at making a wire mesh wreath, but they came out pretty good!  I really love how Mom and Dad's Chip and Dale Candy Cane Wreath turned out!  (Now I need to make one for Eliot and me!)  Later that night, Dad drove us into town so we could have dinner and visit with Katie.


On Tuesday, Christmas Eve Day, Eliot and I decided that we were going to finally go see Frozen.  (We had wanted to Monday, but the ice storm spoiled those plans.)  My brother Jeremy still hadn't seen it so he came with us too.  I even wore my new Elsa t-shirt, my snowflake earrings and the snowflake hair clips that I made!


We ended up getting to the theater just in time for the 3D show!  It was so amazing.  I'm bummed out that it took us so long to see it!  The music was incredible.  I'm still humming "Let It Go" over and over in my head.  The animation was also superb!  I want an ice palace like the one Elsa made!  And I'd love to live in Arendelle.  And I want a dress like Anna's coronation dress... and Elsa's ice dress.  And Olaf was hilarious!  And how cute were baby Sven and Kristoff?  It was so great; I wanna go again!

While watching the movie, I even saw a few of the hidden Easter Eggs!  They were really quick, but I did catch Rapunzel as well as the chocolates from Wreck it Ralph.  I pointed them out really quick, but the guys both missed what I was pointing at.  (I think Eliot was too busy trying to pet baby Sven in 3D.)  I was so entranced by the movie that I totally forgot to look for Mickey Mouse!  Maybe next time!


Photos from Disney's Frozen.
We thought it would be pretty funny to bring Eeyore to see Frozen.  He "snuck" into the theater inside of Eliot's drawstring backpack.  Eliot even found some 3D glasses for him! He was pretty cute with his giant glasses on.


After seeing Frozen, we did a few last minute Christmas errands.  I took a lot of picture of the ice from the storm.  Check out how much ice is on those trees!  It's like Elsa made her return! I'm a total dork and I also took a picture of Eeyore in the snow (ice) making snow donkeys.  


We spent Christmas Eve hanging out in the living room.  Mom and Dad finally kicked us out around 11:00 so Santa would come.  We made sure to "hang" our stockings up first!  I even found a small one for Eeyore!  (Jeremy also bought me a small Bumble one!)


Christmas morning we came down to many presents from Santa!  We all opened our stockings and took turns with opening presents.  I'm so excited!  Santa brought me the tabletop easel that I really wanted.  I also got the silk paint set that I've been looking at for about 2 years!  (Stay tuned for lots of crafty stuff!)  Jeremy got Eliot and me a ton of Disney Infinity figures.  (Now I just need to learn how to play Infinity!)  And Mom and Dad got me the Minnie Mouse Build-A-Bear that I'd asked for.  She has pink and lime pajamas for our wedding colors!!!


We also got Eeyore a few "gifts".  Ok, they're actually Build-A-Bear items, but they'll work for Eeyore and for our family's ever growing BAB collection.  I had gotten him a Santa hat to wear for Christmas, and we thought it was time he have a hockey stick and puck to go with his Sharks jersey.  We also found a Red Sox hat and shirt, some sunglasses and a basketball and hoop.  Jeremy even bought him a Patriots outfit!  (And it actually fits!  Dad squeezed him into the pants.  See photos above!)


Of course, no Christmas Day is complete without the Disney Parks Christmas Day Parade!  This year was even the 30th anniversary of the parade.  (I'm 29, so it's been on television as long as I can remember!)  Unfortunately, our cable was not working correctly due to the ice storm.  We missed the first hour and when the second hour started, it fuzzed in and out the remainder of the parade. 

This is the first time that I've ever missed the parade Christmas morning.  However, I was really thankful that we had power to begin with.  A lot of people in the area didn't even have that for Christmas.  Plus, Eliot and I were DVR-ing the parade back at our house... so I could watch it when we got home anyways!  (On a side note, some of the people without power still won't get power until this Wednesday!  It'll have been out for a week and half!  Yikes!!!)


Christmas afternoon we ended up watching our Disney Wedding DVD with my family. None of my grandparents had seen the DVD yet, and neither had my Dad and brother. Even Mom had only seen bits and pieces of it.  It was a lot of fun to re-live the memories with all of them together.  We really did have an incredible wedding at Disney!


Around 2:00, we ended up losing our power.  We had literally stopped the Wedding DVD about 5 minutes prior.  After a few hours, it was apparent that it wasn't going to turn back on anytime soon, so Eliot, Jeremy and I packed up our stuff before it got too dark out. When Eliot and I left Mom and Dad's house, they still didn't have power.  Luckily, they called us about an hour after we left to say that it had turned back on!  Once Eliot and I got home, we unpacked the car and watched the part of the parade that we missed!

We had a great Christmas and are incredibly thankful to have spent some time with family and friends!  Now we're shifting our focus to New Year's Eve and going to Walt Disney World for the Half Marathon!  It's going to be another few busy weeks!  °o°