Showing posts with label Mickey. Show all posts

Monday, August 10, 2026

Magical Merchandise: Disney Pastel Halloween 2026 ✨๐Ÿ’–๐Ÿญ๐Ÿงก๐Ÿ‘ป๐Ÿ’œ๐ŸŽƒ✨

Happy Monday Everyone!!!  It's been a hot minute (over 18 months... yikes) since my last Magical Merchandise Monday post.  I still collect photos of things that I love, but it's become more of a chore for a few reasons.  First, there are so many Disney news sites (that have tons of writers) who cover new merchandise from the parks and online- so little ole me writing about things feels redundant.  Second, it takes me so much time to compile and edit photos, write the post and credit my photo sources.  So I've kind of let it slip by the wayside again.  Still, every once in a while there's something that really blows me away, so maybe I'll just try to focus on those things for merchandise posts.

Anyways, today I was motivated to post the newest drop on the Disney Store website.  I've been patiently waiting for these items to be released, and it was all I could do not to add every single thing to my cart!  As you know, I'm a complete sucker for anything that's Disney holiday related... but what you might not know is that I'm also a girly-girl pink princess at heart.  So add purple & pink pastel hues, cute Disney images and Halloween together and I basically can't resist it. ✨๐Ÿ’–๐Ÿญ๐Ÿงก๐Ÿ‘ป๐Ÿ’œ๐ŸŽƒ✨

The Disney Pastel Halloween Collection drop this morning completely blew my mind.  It's so good; I pretty much want every. single. thing. from the collection- so let's dive in!

First, we'll check out accessories because those are primarily what I've been dreaming about all day.  Disney released a ton of Mickey and Minnie Cutie Ghost items... I think the most anticipated item was the Mickey & Minnie Cutie Ghost Ear Headband. 

There's also this fun Minnie Mouse Jack-o-Lantern Ear Headband. 

I love the Mickey & Minnie Cutie Ghost Mini Backpack. 

The Mickey & Minnie Cutie Ghost Coin Purse Bag Charm was also really popular.

As was the Mickey & Minnie Cutie Ghost Plush Keychain Bag Charm.

I am definitely getting one of the Minnie Cutie Ghost "Hey Boo" Little Words Project Bracelets.  I am obsessed with their bracelets... but more on that another day.  (Also, who took this photo?!?!  Turn Minnie Mouse around so she's not upside down!)

This Minnie Cutie Ghost Hair Clip would also complete a cutie ghost outift.

I love this Minnie Mouse Big Face Halloween Canvas Tote!!!

Eliot and I will definitely be getting the Mickey Cutie Ghost Light-Up Shoulder Plush.

The Mickey & Minnie Cutie Ghost Halloween Jibbitz Crocs set is really cute.

Don't they look cute on these Crocs???

Next, we'll check out the new clothing.  I think my favorite piece is the Mickey & Minnie Cutie Ghost Sleep Set For Women.  I might have to get these for our Disney Cruise... 

This Mickey & Minnie Cutie Ghost T-Shirt is adorable.

They have versions of this Mickey & Minnie Pumpkin Pullover Sweatshirt for both Walt Disney World and Disneyland.

I'm also in love with the Mickey Cutie Ghost Baseball Jersey.  Eliot and I have a few jerseys from the parks, and I might have to add this one to my collection.

Here are the details... I mean isn't it the cutest baseball jersey ever?!?!?

Finally, we're checking out the home decor pieces.  I think this Minnie Cutie Ghost Plush Pillow is adorable and it would look really cute on my side of our bed.

It would also look great with the Mickey & Minnie Cutie Ghost Throw Blanket... which was the first thing I noticed sold out!  (I'll have to check the parks!)

I might have to get the Mickey & Minnie Cutie Ghost Stainless Steel Travel Tumbler... 

... along with the Mickey & Minnie Cutie Ghost Mug.  (I mean, this would go great with the pajama set while I'm snuggled up in the blanket... wouldn't it?)

The Mickey & Minnie Cutie Ghost Meal Set is another cute addition.

There's also a Minnie Cutie Ghost Light-Up Decor... 

A Minnie Mouse Light-Up Jack-o-Lantern... 

A Mickey & Minnie Halloween Pastel Pumpkin Light Up Decor... 

And last but not least, a Mickey Halloween Light & Sound Bubble Cutie Ghost.

Unfortunately, some of these items sold out before I was even able to finish this post!  So if you've got your eye on something from this collection, you better head to your local Disney theme park to snatch it up before they sell out there!  

I'm really hoping things will stay in stock for a while considering that it's only August... but I guess time will tell.  As much as I want some of these items, it's hard to press the go button when I know I have a 20% off Annual Passholder discount that I can use in the parks... and we'll be there next month!  Fingers crossed I'm able to add some of these cutie items to my collection!!! ✨๐Ÿ’–๐Ÿญ๐Ÿงก๐Ÿ‘ป๐Ÿ’œ๐ŸŽƒ✨

All photos from this post are taken from the Disney Store's website (or from the email they sent out) of items from their 2026 Halloween collection.

Tuesday, April 4, 2023

DIY: Wood Mickey and Minnie Easter Egg Decor

It's been a while since I took the time to work on a DIY craft that was just for me.  I keep setting craft supplies aside, and then I never seem to find time to get to it.  So when I saw some wooden Easter eggs at Michael's a few weeks ago, I knew I needed to get them and find the time to make something for Easter.

The result were these cute Mickey and Minnie Mouse Easter Eggs that I'm going to use to decorate our master bathroom!  The best part, is that this was really easy to do.

Here's how I made them!

Materials:

Two Wood Egg Shapes (I got these from Michael's)
Paint Brushes
Black, Red and White Acrylic Paint
Pen or Pencil (not pictured below)
Round Object to Use for Stencil (not pictured below)
Sealant Spray (not pictured below)


1.) Prepare the Wood Eggs
Before I started with anything else, I used a pen to draw a line across both of the egg shapes to show where the black and red paint would meet.  (For mine, I went a little bit above the half way mark.)  Make sure the lines are at the same location on both eggs!


2.) Paint A Base Coat
I started with a coat of red paint on the bottom of both eggs.  After that dried, I painted black on the top half of both eggs being careful to make a clean, as straight as possible line where the red and black paints met in the middle.


3.) Paint More Layers
Depending on what brand of paint you use, you might need to do another coat or two to properly cover the wood.  I had to do a second coat of the red paint, but the black paint I used covered the wood after one layer.  Thankfully, acrylic paint dries pretty quickly so I set a timer for 15 minutes in between coats and jammed out to Disney Hits on Spotify while I waited for each layer to dry.


4.) Add White Details and Touch Ups
Once you are happy with the coverage of red and black paint, you need to add the details.  For Mickey, I drew two large ovals for his buttons and then filled them in with white paint.  For Minnie, I used a round 3D printed piece as a stencil to draw dots all over the red part of the egg.  Then, I filled them in with white paint.  You might need a few coats of white to cover the red paint.  If you make a mistake, this is the time to do touch ups to your red and black sections.  Let the entire thing dry for a while; you want to make sure that it's completely dry before you move to the next step.


5.) Seal the Paint
Once your acrylic paint is dry, you want to seal it.  Acrylic paint can get damaged with water, so you want to give it a spray of acrylic paint sealant to make sure that it doesn't get damaged.  I gave mine two coats of sealant since my decoration is staying inside, but it'll be in the bathroom with lots of moisture.  (If you're putting your eggs outside, I would give them at least 2-3 coats of sealant to protect them from the elements.)


And there you have it... simple and easy Mickey and Minnie Easter Egg Decorations that you can place pretty much anywhere!  These were definitely an easier project for me, but I'm happy to have spent some time doing something for myself and not just for the businesses.  Plus, they'll be really cute to display each Easter and give our master bathroom a little touch of Disney Easter magic!  °o°

I hope you enjoyed this tutorial!  If you make one, please comment below, send me pictures over on Facebook or tag me in your photos on Instagram! 

Friday, November 18, 2022

Fun Find: Mickey- The Story of a Mouse Trailer Video

94 years ago, Steamboat Willie premiered and with it came the screen debut of our favorite mouse.  In recent years, the Walt Disney company has declared November 18th "Mickey's Birthday" and has celebrated the day in various ways.  Today, they released a new documentary exclusively on Disney+ that tells the story of Mickey.

I honestly didn't even realize this was being released until I popped into our Disney+ account this morning to find something to watch while I was eating my breakfast.  I took a peek at the new releases knowing that Disenchanted came out today... then I saw the link for the Mickey documentary.  I had to know more so I found this trailer.

Eliot and I have learned a lot about Mickey and how he came to be.  There's a great exhibit about Mickey at the Walt Disney Family museum and we really enjoyed delving into the story of how Walt created him.  I love Disney's documentaries and I think this is the perfect way to celebrate Mickey's birthday today!  I'm not sure what time Eliot will finally be home from work, but I've found what we're watching tonight before bed!

If you're looking for something to watch this weekend, you can find Mickey: The Story of a Mouse now streaming over on Disney+.  I hope you enjoy this fun find!

Happy Birthday Mickey!!! (and Minnie!!!)  °o°

Wednesday, February 23, 2022

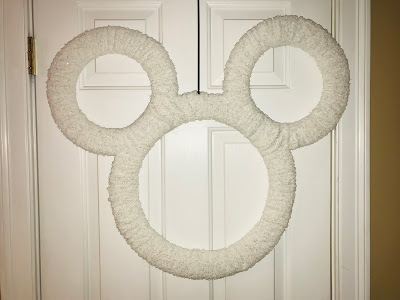
DIY: Mickey Mouse Winter Yarn Wreath

How is February already almost over?!?  We're seven and a half weeks into 2022 and time is chugging on faster than it needs to be.  I've been wanting to work on something personal (for our house) for a few months now, but time hasn't been on my side.  After missing out on making crafts for the holiday season, I really wanted to start this year off right.  I've also been wanting to make this wreath project for a few months, and I finally decided to do it before winter slips by and fades into spring!

Back at the height of the holiday season in November and December, I saw so many people making these.  I'm in a Disney home decor group on Facebook and everyone was going crazy for these fuzzy Mickey Mouse yarn wreaths.  They are so easy to make and they're perfect for Christmas and the winter months!  

Want to make one of these cute Mickey yarn wreaths for yourself?  Here's how I did it!

Materials:

1 Large Wire Wreath Bases (I used a 18" wreath base)
2 Smaller Wire Wreath Bases (I used two 12" wreath bases)
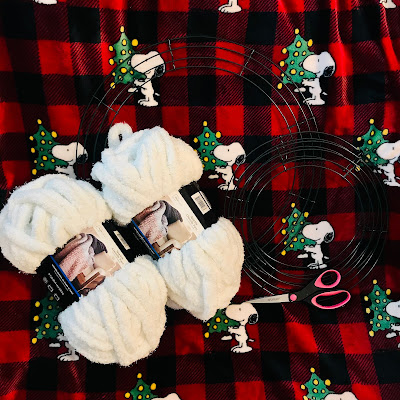
White or Ivory Chunky Yarn (I used 1 full skein, plus a little bit of a second one)
Zip Ties
Scissors
Optional- Embellishments and Seasonal Decor (snowflakes, ribbon, floral picks, etc.)


1.) Attach the Ears to Your Large Wreath Base

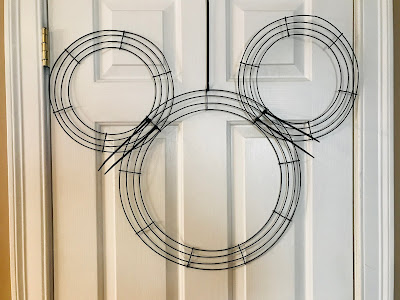
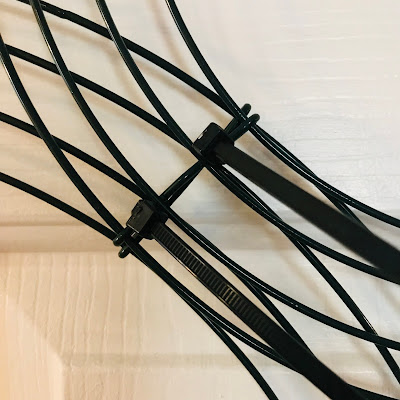
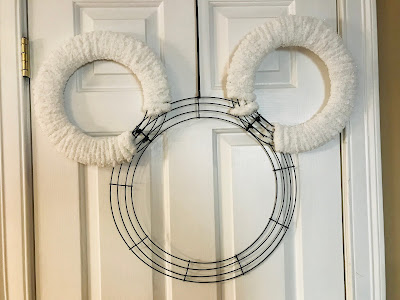
The first thing I did was attach my two smaller wreath bases to the large one.  In order to keep them even, I used the cross wires on the large one to space the ears.  Then, I covered those with the cross wires on the smaller wreaths.  Once they were lined up, I used zip ties to attach them to each other.  (See photo below.)  On one side, I only needed two, while the other side needed three to keep the ears secure.  Cut the zip ties when you are happy with their placement.


2.) Wrap the Ears

Next, wrap the ears with yarn.  Tie the end of the yarn to one of the wires and then start wrapping it around the wreath form.  I quickly found out that the skein of yarn was too much to keep passing thorough the wreath, so I cut my yarn into smaller sections to make it easier.  When you reach the end of that yarn strand, you can tie it to the wreath, or you can tuck the ends under one of the other wraps on the back.  Start another strand and keep doing this until you've covered both ears.


3.) Wrap the Bottom Part of the Head

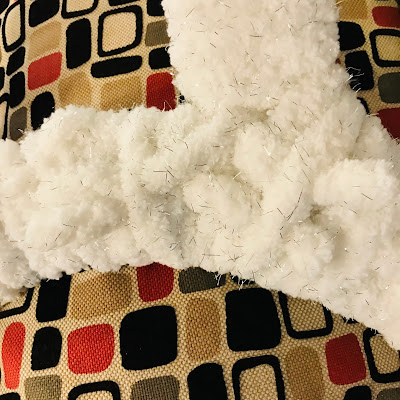
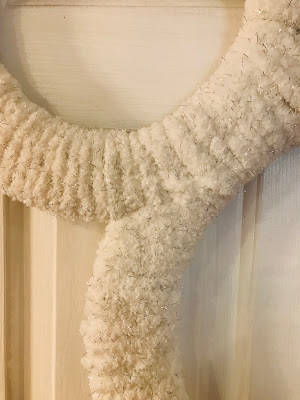
I used the same process as Step #2 to wrap the bottom part of the head.  I started below one ear and kept going until I reached the bottom of the other one.  You can tuck the ends of the yarn into the area where the ears and head meet.  (See photo below.)


4.) Wrap the Area Around the Ears and Top of the Head

The hardest part for me was wrapping the yarn around the area where the ears and the top of the head meet.  Thankfully, with the wire wreath bases you can wrap the yarn in multiple areas.  I looked at where I needed to fill the ears and then wove the yarn around that spot.  In some places, I was only covering part of the wreath form and going in between the wires.  While in other areas, I went from the head all the way through to the ear.  Just do what looks right and fills in that area so it looks clean.  Oh, and don't forget to make sure you cover the zip ties!  (See photo below.)


5.) Fluff and Add Embellishments (Optional)

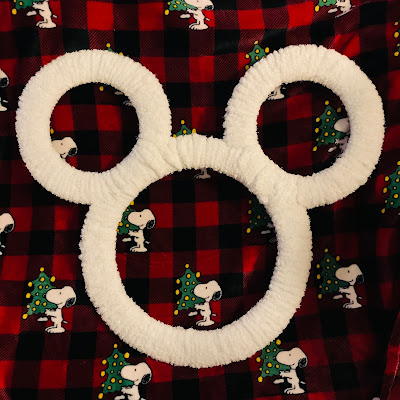
Once that entire area around and between the ears is covered in yarn, you're done!  I hung my wreath up and fluffed out of of the areas where the yarn was tight.  Once it's wrapped, you can gently move the yarn if it's too tight or too loose in areas.  

If you want, add embellishments and/or seasonal decor to give your wreath more of a pop!  I wanted to put buffalo plaid ribbon on mine but I couldn't find it.  (Hence why I used Eliot's buffalo plaid Snoopy blanket as a backdrop instead; I just love how it looks against buffalo plaid!)  Also, if you don't use hot glue to permanently attach your decorations, you could change it for the seasons.  I think you could use ribbon, glittery snowflakes, or floral picks and they would all look beautiful with this wreath.  It's such a simple and neutral design that you could do a lot with it!  It also looks great as is!


Isn't this Mickey Mouse Winter Yarn Wreath cute?!?!  It's really soft too.  I also love how the yarn I found has little specks of metallic silver in it!  It makes it a little bit shimmery.  I'm definitely going to make more of these Mickey wreaths for our house!

I hope you enjoyed this tutorial!  If you make one, please comment below, send me pictures over on Facebook or tag me in your photos on Instagram!  °o° 

Monday, February 21, 2022

Magical Merchandise: Stoney Clover Lane Mickey & Friends Collection

Happy Monday!  February is flying by and our trip to California will be here before I know it.  Eliot and I are going to be crazy busy this week; still, I wanted to stop by to share some merchandise with you.  Today, we're heading back to Stoney Clover Lane.

Photo Source

I first introduced you to Stoney Clover Lane back in August when they released their first Disney collaboration, the Princess Collection.  It was a huge success and sold out almost immediately.  (It's recently been re-stocked if you had your eye on something!)

Photo Source

On February 12th, Stoney Clover Lane released their newest collaboration, the Mickey and Friends Collection.  The collection consists of five different patterns.  

Photo Source

The Sensational 6 pattern is pink with Mickey, Minnie, Donald, Daisy, Goofy and Pluto. 

Photo Source

Dynamic Duo is light blue and white stripes with Mickey and Minnie faces on it.  

Photo Source

Ultimate Pair is pink with white polka dots and has Mickey and Minnie standing.

Photo Source

Friends Forever is red with white hearts and has a repeating pattern of the Fab 5 on it.

Photo Source

Yours Truly features Mickey Mouse on a tan and white striped background.  There are also Mickey gloves in the peace sign, stars and Mickey heads all over it.

Photo Source

They released coordinating character patches of the Sensational Six: Mickey, Minnie, Donald, Daisy, Goofy and Pluto.  Mickey and Minnie come in large and small patches.  

Photo Source

They also made full body patches of Mickey and Minnie standing!

Photo Source

They released chenille Mickey Mouse head patches in seven different colors.

Photo Source

My favorite part of the collection were actually the Mickey font letter patches!  I love these!  At $20 each, they're too expensive for me to put my name on something... it would cost $140 just to personalize it!  But I think they're really cute and fun!

Photo Source

I love all of the personalization options between the character patches and the letter patches.  You could do your name, initials, or nickname.  Or, you could write Mickey, Minnie, Magic, Snacks, Ears or something else Disney inspired on your pouches.  The personalization possibilities are pretty much endless!

Photo Source

I think the best part is that the entire Mickey and Friends collection coordinates well together.  There are plenty of pieces of each pattern for people who like to match perfectly.  But I also think the entire collection coordinates really well together!

Photo Source

If one of these items caught your eye, most of these pieces are still still available on Stoney Clover Lane.  Grab it before it's gone if you you can't live without it!  °o°