Showing posts with label gingerbread. Show all posts

Sunday, June 5, 2022

National Gingerbread Day 2022

Happy National Gingerbread Day!!!  If you've hung around here, you know how much I love gingerbread.  From making Mickey Gingerbread Cards, to collecting gingerbread items for Christmas decorations, to decorating and eating cookies, to drooling over all sorts of Disney holiday merchandise... I love me some gingerbread.

At first, I wasn't sure what to write, but I decided I'd write about my favorite Disney gingerbread experiences.  There are so many things that incorporate gingerbread. 

The first thing I think of when I think of Disney and gingerbread is the giant house at the Grand Floridian Resort.  I look forward to seeing what the house looks like every year.  It always amazes me with how big it is.  I made so many models during my interior design classes in college; I have such an appreciation for things like this!

Another thing I love is the display at the Contemporary Resort.  One of my favorite designs was this display of Cinderella Castle, Cinderella and Prince Charming.

Something I wasn't expecting was a gingerbread house in the Disney Dream lobby.  I was surprised to learn that each of the ships also get their own gingerbread house!

One of my favorite memories was going to the gingerbread decorating session aboard the Disney Dream with my family.  Eliot and I had a blast doing it, and I know that my Mom, Dad, Jeremy and Nana enjoyed it too.  It was fun and delicious! 

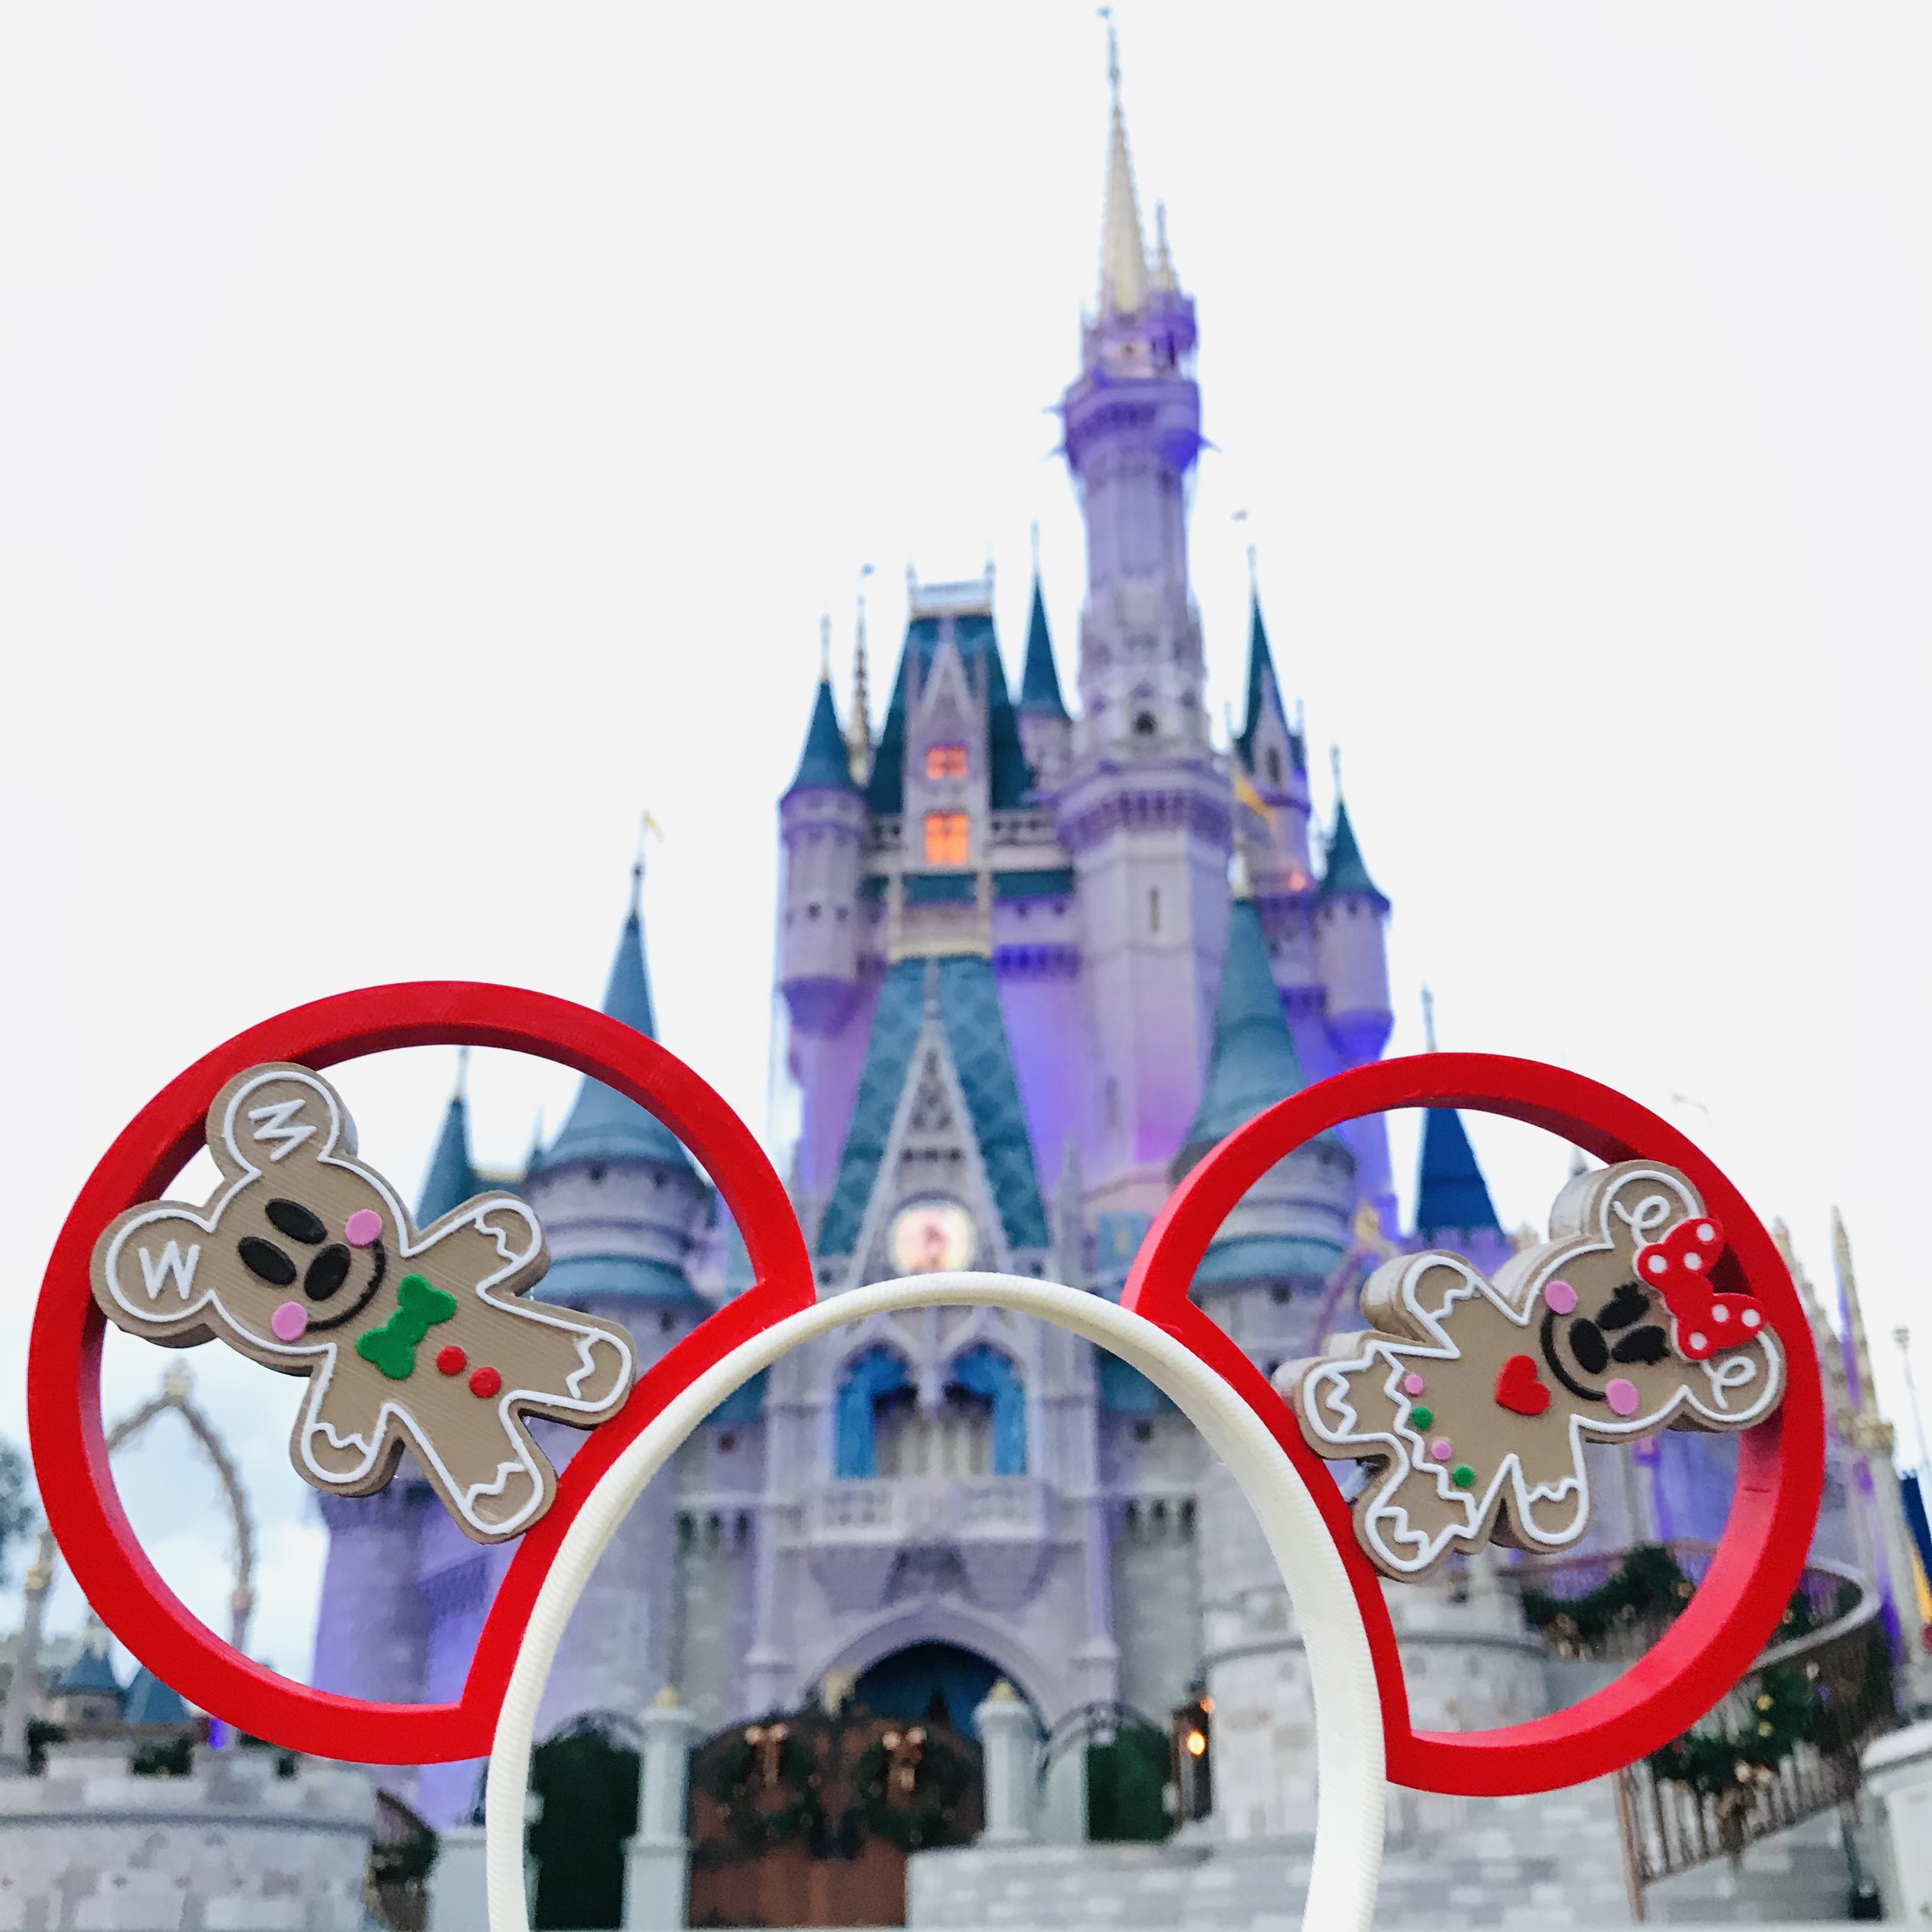
Finally, it's not an "official" Disney thing... but the Mickey and Minnie Gingerbread mouse ears that Eliot made me a few years ago are one of my favorite things.  I've loved this design for years, and for years it was only available on merchandise over in Japan.  The US Disney Merchandise Team has finally caught up with the times over the past few years, but for the longest time I couldn't find anything over here.  Eliot made me this design after I basically begged him to and these ears are still one of my favorite designs that we do.  They're always pretty popular each holiday season too!

As you can see, I'm pretty big on gingerbread!  While I have no idea why National Gingerbread Day is celebrated in June when Gingerbread Cookie Day is in November and Gingerbread House Day is in December, I'm still happy to celebrate it now!  (Plus, I guess it just spreads the celebration out!)  Happy National Gingerbread Day!!!  °o°

Monday, November 2, 2020

Magical Merchandise: 2020 Disney Christmas Collection

My favorite time of the year is here, and with it, loads of fun new Disney Christmas merchandise!!!  Some of these items have been available on Shop Disney for the past few weeks as well as in stores for a few weeks.  However, a lot of the items were just released last Monday and the rest of them arrived online earlier today!  I've been dying to write about these new items and to get this post out in the world.  And now that Halloween is officially over, I no longer feel like I have to hold back.

Photo Source

After this spectacularly awful year, I think a little Disney Christmas magic is just what the doctor ordered!  And we're in luck because the 2020 Disney Christmas collection is a dream come true.  From the Mickey and Minnie gingerbread cookies, to the Mickey and Friends Christmas motif, to little snippets of the Disney Parks attractions.  There are so many pieces in this collection that I love.  It's hard to narrow them down, so I'm going to post a few of my absolute favorites from each category.  So let's do this!!!

Photo Source

CLOTHING

Holiday Spirit Jerseys- Eliot and I are obsessed with these!  I love how they have the characters on the bright red jerseys this year!  The peppermint designs are cute too!

Photo Source

Silver and Gold Spirit Jersey- I love how this is a classy design for all winter!

Photo Source

Family Christmas Sweaters- These are always a favorite of ours!  I love how they added the Christmas lights to this year's design!

Photo Source

Christmas Treat Leggings- I absolutely love these... and I love Disney treats!

Photo Source

Fantasyland Shirt- I love how this shirt combines treats and my favorite attractions!

Photo Source

ACCESSORIES

Disney Parks Christmas Loungefly Backpack- I love this bag and how it has Santa Mickey, the castle decorated for Christmas and icons from our favorite park attractions!

Photo Source

Peppermint Minnie Loungefly Backpack- This bag is so cute!

Photo Source

Disney Treats Alex and Ani- I had to get this since I missed out on last year's design.

Photo Source

Mickey Gingerbread Hat- I love this adorable hat!  Eliot and I both got one!

Photo Source

Crocs- I love this design and how they have the fuzzy red inside.  Comfy and cozy!!!

Photo Source

Mickey Earrings- I love this Mickey Christmas Light design on sparkly earrings!

Photo Source

Silver and Gold Winter Hat- Simple and classy winter design with a fun pom pom!

Photo Source

Silver and Gold Scarf- This scarf is perfect to stay warm all winter long.

Photo Source

HOME DECOR

Mickey and Minnie Gingerbread Plush- These are so cute and they actually smell like gingerbread too!  Thankfully, Eliot snatched these up pretty quick because they sold out and haven't come back in stock online since.

Photo Source

Christmas Home Decor- I've been waiting for a Christmas collection that really spoke to me.  I love the Disney decor every year, but this year I absolutely love it.  I know what's going on my Wish List for Santa Claus!!!

Photo Source

Gingerbread Countdown- This piece is absolutely adorable.  It's sold out online a few times but they've brought it back.  Grab it if you want one!

Photo Source

Christmas Kitchen Items- I love how there are a lot of gingerbread kitchen items too!

Photo Source

Gingerbread Cookie Jar- This cookie jar is really cute... I had to have one!

Photo Source

Fantasyland Castle Light Up Decor- This little light up decor is so cute.  The inside is made with wood and it lights up.  Eliot bought it when it was released last week and I'm so glad because it's already sold out online.

Photo Source

ORNAMENTS

Gingerbread Ornaments- There are so many good ornaments this year, but my absolute favorites are these cookie ornaments of all the characters.  Thankfully, Eliot bought them as soon as we saw them come online... because they sold out almost immediately and they haven't come back.

Photo Source
TOYS

Christmas Figurines- These little toys are so cute!  I thought they'd be really cute for a little display on the mantel or kitchen window.

Photo Source

Mickey Bubble Wand- This was another must get.  It makes "snoap" like the Disney parks so people in warmer climates can also experience snow!!!

Photo Source

Forky Plush- Finally, I love this cute Forky plush.  I'm pretty obsessed with Forky anyways, but his cute little hat and candy cane make him so much more adorable!

Photo Source

Isn't this collection a dream?  I absolutely love it!  I've always been pretty obsessed with gingerbread so I'm excited that they've expanded on designs for this year!  Plus, I can't help but love all the Disney treats merchandise... anyone notice a theme here?

Photo Source

This Christmas merchandise definitely makes me feel the Disney holiday magic even though I can't be there in person.  After this year, I'm pretty sure we all need a little bit of magic.  Why not sprinkle our homes and daily lives with a little bit of pixie dust?  "We need a little Christmas, right this very minute.  We need a little Christmas now!"  °o°

Saturday, December 20, 2014

Fun Find: Gingerbread Wonderland

Hi friends!  It's time for another fun find!  Last year, I came across a website for Disney's Gingerbread Wonderland.  The display, created out of gingerbread, modeling chocolate and icing, was on display over at Epcot during the holiday season of 2013.  I was excited to discover that the website with the photos is still active!

Photo Source: Disney's Gingerbread Wonderland
The masterpiece consisted of gingerbread models showcasing all of Disney's different travel experiences: Walt Disney World Resort featured Cinderella Castle, Disneyland Resort featured Sleeping Beauty Castle, the Disney Cruise Line featured the Magic, Aulani Resort & Spa in Hawaii was included and finally Adventures by Disney featured the Great Wall of China, the Eiffel Tower and the Leaning Tower of Pisa.

Photo Source: Disney's Gingerbread Wonderland
On the website, you can get a closer look at the models.  You can do a 180 view of each design as well as look at detailed photos.  You are also able to watch videos about the making of Gingerbread Wonderland.  I love watching the design come to life! It reminds be of making models in my interior design classes during college.  The time lapse video shows you how they put the design together with the gingerbread "houses" and the scenery.  It's incredible to see the end result!  It took 15 pastry chefs six months of work to complete the display!  The coolest part is that everything is edible!

Photo Source: Disney's Gingerbread Wonderland
Another great feature is where you can make your own gingerbread castle picture frame!  (There's a link of the bottom right side of the page.)  Or you can click here to download the directions to build your own gingerbread castle frame!  Yum!  °o°

Friday, August 8, 2014

DIY: Gingerbread Mickey Christmas Cards

Hi Friends!  As promised, here is the tutorial for the Gingerbread Mickey Christmas Cards that I made for the Christmas in July Card Swap!


Materials:
Brown, Green, Red and Striped Cardstock (scrapbook paper)
White Cardstock, Paper or Cereal Box (for making a template)
Pencil
Scissors
Paper Cutter
White Ink Pen
Red Pen or Marker
Brown Pen or Marker
Mickey Mouse Hole Punch
Glue
Double Sided Tape


Steps to Make Gingerbread Mickey Christmas Cards:

1.) Sketch the template
Take your white cardstock (or cereal box/paper) and make a Mickey Mouse gingerbread man template.  I used a few photos of Mickey and Minnie gingerbread merchandise from Toyko Disney that I found on Pinterest.  (Top left photo found here.  Bottom photo found here.)  I used the photos as a guideline for creating my shape.


2.) Trace and cut gingerbread Mickeys out
Once you are happy with your gingerbread Mickey, cut the template out.  Use the template to trace gingerbread men out on your brown cardstock.  I used a pencil to trace on the smooth side of my cardstock.  I wanted the rough side to be the gingerbread. When you're done tracing, cut out all of your gingerbread men.


3.) Make the cards
Cut your cards out of green cardstock using your paper cutter.  The cards can be any size you wish, just remember that they have to fit into an envelope!  I made my cards 4x6 inches.  (I cut the paper into 6" x 8" sections and folded them in half.)  Next, cut your striped paper so it's a little bit smaller than the 4x6 inch size.  I cut mine about 1/4" smaller so there would be a small border around the edge.


4.) Decorate the Mickeys
Next, you have to decorate your gingerbread men with "icing".  Trace the outline of your Mickey with your white pen.  Then add a few squiggly lines at his arms and feet.  (See photos above.)  Finally, add a little bit of white "icing" to his ears.  Use your red pen to make buttons and your brown pen for his face.  (You can decorate him more!)

Note: I originally attempted to use puffy paints to create a 3D icing look.  (Photo below.)  It turned out really cute, but it was time consuming and very messy.  It was too easy to smudge them.  Since I had so many to do, I abandoned this idea and went to the store to buy a white ink pen instead.


5.) Put Card Together
Once you have all of the pieces for your cards cut out, you can put them together.  I did this step after decorating my gingerbread Mickeys to make sure the ink dried all the way. Use the double sided tape to attach the striped paper to your cards.  (You can also add some white cardstock to the inside of the card if you'd like to make space for writing a message.)  Once your gingerbread Mickeys are dry, use the double sided tape to attach them to the front of the card.


6.) Add Embellishments
Finally, make the card pop with some embellishments!  I punched out red Mickeys and used glue to attach them to the inside of the card.  (I thought it needed a little more color on the inside.)  You can add anything you'd like: ribbon, glitter, stickers, stamps, etc.


Once everything is glued down and dry, you're done!  Enjoy your Christmas cards!!!  °o°

Thursday, August 7, 2014

Scrapbook Swap: Christmas in July Card Swap

Yesterday, I told you guys about the scrapbook bottle swap we did last month!  We also had a "Christmas in July Card Swap" in the Disney Scrapbookers group on Facebook! As you all know, I love the holidays and I love Disney.  Therefore, this swap event was definitely on my to do list!


It was set up so we each made a card for everyone who participated.  Since we had 20 members sign up, we were given the option of being divided into smaller groups. In true Melissa fashion, my vote was to be in the big group.  (More group members, more cards!)

We ended up with two smaller groups of four people, and one large group of twelve.  I was in the big group, so I had to make eleven cards for the swap.  (But, I made myself a few extra cards because they're so darn cute!)


Before I settled on a design, I searched for ideas on Pinterest.  Pinterest is my "go to" location for inspiration.  I started a Christmas Card board to collect my ideas and thoughts.  Sorry- this one is a secret board!  I can't give out all of my awesome ideas!  ;-)

I wanted a fun card design.  But I also needed one that wouldn't be too difficult to replicate multiple times.  Eventually, I decided to go with a Gingerbread Mickey Christmas card.  I love gingerbread houses.  (It's probably the interior designer in me.)  And I've always thought gingerbread Mickeys were really cute.  In the end, I found the perfect balance of cute, but not too complex or complicated!


Here's how they came out!  I absolutely love them.  I've always enjoyed card making.  I used to make all of my furniture store co-workers Christmas cards each year.  I really should do it more often!  (Want to make your own?  Stop by tomorrow for a tutorial!)


Of course, the main point of the card swap is to give and to receive!  Here are the cards I have received so far!  (A few of them are still on their way.)  I'm so happy that I signed up to be in the big group!  I really wanted to see all of the cards.  This is a great way to get new ideas to make my own cards for Christmas!

This swap was a blast and it's definitely put me into the Christmas (in July) spirit.  I really hope we do another card swap around Christmas!  I've got so many different ideas!  °o°

Tuesday, December 17, 2013

Preparing for Christmas

Christmas is quickly approaching and honestly, I feel like I'm so far behind!  Anyone else feel that way?  Being sick threw everything off, and I'm scrambling to get caught up!

On Friday, I worked on our Christmas card photo.  I had a random design idea and went with it.  About 45 minutes later, our custom photo card was complete!  It came out so cute!  I absolutely love it!  (I can't wait to share it with you... but I'll wait until I actually put them in the mail for our friends and family.)  Eliot loves it and thinks that I should sell it as a printable on Etsy.  So maybe I'll have it available for you guys next year?  Here's a sneak peek!  


Saturday we were preparing for Winter Storm Elsa.  Ok, so it was really named "Electra." But as my Facebook fans know, I decided to call it Elsa.  It's more appropriate, right?  We were supposed to get 14-18 inches of snow!  (In the photo below, we are in the 8-14" area, but they later adjusted the forecast telling us to expect more snow.)

Photo Courtesy of WABI Facebook Page
After running around getting gas, food, and having oil delivered, we were ready for Elsa! Eliot and I spent the rest of the day putting up our Christmas tree and decorating the kitchen and living room with window clings.

On Sunday, it was clear that Elsa had arrived overnight.  Around noon, Eliot and I went outside to shovel our walkway and back deck.  Our walkway was about 16 inches deep! And then our back deck ended up being over 2 feet deep due to the snow drifting!  Check out that pile of snow on our table!  The final snow total for our city was 16 1/2 inches!!!


We lost our decorations in the winter wonderland of snow!  Eliot had snow-pants on so he jumped in and dug Mickey, Minnie and our inflatable snowman out of the snow.  Minnie's nose was just barely sticking out of the snow so we could locate them.  (I wish that I'd taken a picture; it was pretty funny.)  Our pathway markers are still under the snow, but they're trying to peek out!

Sunday night I watched the Once Upon a Time winter finale.  Argh!  I won't spoil it for those of you who have not seen it yet.  But what was that?  It's getting really crazy!  I think I have a love/hate relationship with it.  I can't believe that it won't be back until March!!!  Is it March yet?!?!?  Now?  How about now?  Ugh.


Monday, we woke up to a beautiful sunrise.  I spent the day curled up on the couch on "stake out".  I was expecting FedEx and Home Depot was coming to deliver our new dishwasher.  FedEx came around lunch time with a surprise: Our wedding albums!!!  

I was so excited to get our wedding photo albums!  I know what you're all thinking. "You're just getting them now?  Over a year later?"  It's not Disney's fault!  We had so many beautiful pictures that it took us a long time to figure out which ones we wanted in the book.  (I just ordered them in a few weeks ago.)  They did not disappoint.  The albums are absolutely beautiful!  Check out those cute Mickey details inside the book!  Love it!!!


I was on the couch the entire afternoon waiting for Home Depot, so I decided to finish my Once Upon a Time Season 2 marathon.  (I only had 3 more episodes left to watch.) While watching, I worked on a few more decorations for our kitchen cupboards.  I made a Christmas tree, a Santa Mickey hat and a Gingerbread Man.  Then, I used my Mickey Mouse paper punch to make some ornaments for the tree.  They're made out of card stock and colored with markers.  They're pretty easy to make and don't require too much time so it was a nice way to relax.  And our kitchen looks all festive now!


However, I still have a lot to do.  Over the next few days, I'm planning to work on more Christmas projects and a lot more decorating!  Stay tuned!!!  °o°